How Layer Height and Print Speed Affect FDM Print Quality
- Jun 25, 2025
- 4 min read
If you have ever wondered whether it is worth sacrificing print speed for surface detail, this experiment provides useful insights for making that decision based on your goals. We tested three different layer heights and print speed using the popular 3D Benchy model to explore how print speed, quality, and fine detail are affected in real-world FDM 3D printing.
All models were printed on the same machine using the same PLA filament and default slicing settings, with only the layer height changed. Each print was photographed exactly as it came off the print bed, with no post-processing or clean-up applied, in order to show the genuine output.

This post compares standard, high-quality, and ultra-fine print profiles and includes actual slicer data and photos from the completed prints.
What Is Layer Height and Print Quality in 3D Printing
Layer height and print quality in FDM printing are closely connected. Layer height in FDM printing is the thickness of each individual layer laid down during the print. Lower layer heights create more detailed parts with smoother surfaces, especially for sloped or curved shapes. However, more layers mean longer print times.
Here are the slicer settings and estimated times:
0.20 mm Standard: 42 minutes

Upside Parts - Slicer screenshot for layer 0.2 mm 0.12 mm High Quality: 1 hour 19 minutes

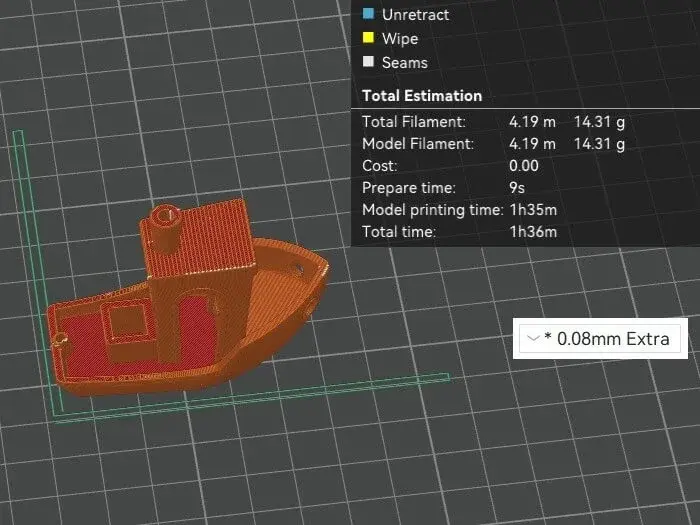
0.08 mm Extra Fine: 1 hour 36 minutes
The total filament use stayed nearly similar across prints. The difference was strictly in detail and time.
How Print Speed Changes with Layer Height
Print speed in this test remained consistent, but the total time increased sharply with lower layer heights. This is because thinner layers mean the printer must complete more passes to build up the same model height.
Here is a quick summary:
Layer Height | Estimated Time | Filament Used | Weight |
0.20 mm | 42 min | 4.14 m | 14.16 g |
0.12 mm | 1h 19m | 4.05 m | 13.84 g |
0.08 mm | 1h 36m | 4.19 m | 14.31 g |
Lowering the layer height from 0.2 mm to 0.08 mm more than doubled the print time while slightly increasing detail. That trade-off becomes clearer in the printed models.
Real-World Comparison Using 3D Benchy Models
In these photos, we compared the printed Benchies under consistent lighting conditions.

From left to right in our comparison photos, the models are arranged in descending order of layer height. The Benchy on the left was printed at 0.20 mm, the center one at 0.12 mm, and the one on the right at 0.08 mm. Stepping was visible on all three prints, though it became finer and less noticeable with lower layer heights. Visually, the 0.12 mm Benchy in the center appeared the most balanced, offering strong detail without the slight stringing and surface artifacts seen in the 0.08 mm print. The 0.20 mm Benchy printed the fastest and held its form well, but layer transitions were more visually pronounced.

The 0.12 mm model struck a clear balance. It retained good detail without the extended print time of the extra fine version. Shrinkage near the internal deck zones was more visible in the thinner layers, likely due to cooling contraction. You can spot this along the inside walls or lower rear overhang.
When to Use Each Layer Height for Best Results
Here is a simple comparison of results:
Layer Height | Print Time | Surface Detail | Notes |
0.20 mm | 42 min | Moderate | Best for speed, visible stepping |
0.12 mm | 1h19m | High | Balanced detail and speed |
0.08 mm | 1h36m | Very High | Smooth finish, minor stringing |
Choose layer height based on what your model needs and understand how layer height and speed affect both efficiency and results. For mechanical parts or quick prototypes, 0.2 mm is more than enough. For display items or organic shapes where finish matters, 0.08 mm can deliver better results, but only if time allows.
Practical Takeaways for FDM Printing Settings
This small experiment shows how layer height and print speed can impact quality. All photos included in this post show actual printed models with no post-processing or editing applied. We kept the visual evidence true to the raw output so that any surface imperfections, layer stepping, or print artifacts could be clearly visible.
The 3DBenchy model, developed by Creative-Tools.com, was selected for this test due to its role as a recognized benchmark in 3D printing. According to the official 3DBenchy brochure, the hull and roof include large overhanging and curved surfaces, which are great for detecting any visible stepping or layer deviation. Our results reflect how clearly these low-slope zones reveal the impact of changing layer height.
In particular, the image showing all three Benchies from above illustrates how layer resolution affects the perception of smoothness along curved surfaces. The rear window, chimney, and bow overhangs further show typical challenges in fine printing, such as sagging, misalignment, and overhang instability. These features were designed to expose print weaknesses without the use of support structures.
While smaller layers help with detail, they are not always the right choice. They can highlight print defects, increase shrinkage distortion, and demand more attention to cooling and supports.
For everyday users of FDM 3D printers or those who rely on 3D printing services, 0.12 mm often represents the best compromise. It offers quality without overwhelming time costs and tends to avoid the performance quirks of ultra-fine prints.
If you need fast output, go thicker. If you need sharp details, go thinner. The best settings are the ones that match your print’s purpose.
If you are also exploring ways to improve the top surface of your prints, see our recent post on testing surface quality with 3D printing ironing in FDM where we compared the effect of ironing settings on flat top layers. This feature can enhance the visual finish of flat parts and is a helpful complement to layer height adjustments.


